As an Amazon Associate, we earn from qualifying purchases. Some links on this site are affiliate links at no extra cost to you. Our recommendations are based on thorough research and editorial judgment.

How To Set Up A Launch Monitor In Your Home Golf Simulator?
To set up a launch monitor in a home golf simulator, start by selecting a compatible device. Choose from entry-level to premium monitors based on your budget and needs. Guarantee adequate space: a minimum ceiling height of 9 to 10 feet and a safe swing area of 7 feet is essential. Install it on a stable surface, aligning sensors properly. Finally, integrate software using Bluetooth or WiFi for data handling. Further insights into optimizing your setup await.
Key Takeaways
- Choose the appropriate launch monitor based on your budget and required metrics, ensuring compatibility with your existing equipment.
- Ensure your space meets minimum requirements: a ceiling height of 9-10 feet and a width of 14-15 feet.
- Properly install the monitor at a stable location, adjusting height and angle for optimal sensor alignment.
- Connect the monitor to reliable software via Bluetooth, WiFi, USB, or Ethernet for seamless data transmission.
- Maintain your setup by regularly cleaning equipment, calibrating software, and adjusting lighting to enhance performance.
Choosing the Right Launch Monitor for Your Setup
You may be interested


Choosing the right launch monitor for a home golf simulator can greatly influence the quality of practice sessions and overall performance improvement. Several factors come into play, including budget considerations and feature comparisons.
- Budget Considerations:
- Entry-level devices are available under $1,000, ideal for amateur golfers.
- Mid-range options ($1,000–$4,000) offer enhanced metrics and features.
- Premium monitors over $4,000 provide tournament-level accuracy and advanced analytics.
- Photometric models excel in image capture, while radar devices are more versatile.
- Integrated simulation software and touchscreen interfaces simplify the experience.
- Some monitors, like the Rapsodo MLM2PRO, offer pro-level accuracy with advanced tracking technology that enhances the training experience.
- Ceiling Clearance: A minimum height of 9 to 10 feet is recommended for full swings. Taller players may require additional space.
- Swing Radius: A safe swing area of approximately 7 feet around the golfer is crucial, with total room width ideally 14 to 15 feet to accommodate various swing types.
- Depth: A distance of 10 to 12 feet from the tee to the screen helps capture proper ball flight. Radar systems, needing more space behind the tee, require 6 to 10 additional feet.
Selecting a monitor that aligns with budget and feature needs guarantees lasting engagement and satisfaction within the golfing community.
Recommended Products

SKYTRAK ST MAX Launch Monitor – Delivers tour-level accuracy with dual Doppler radar, photometric cameras, and GOLFTEC Speed Training to help you build speed and distance - plus dual ports so you can charge and play without interruption.

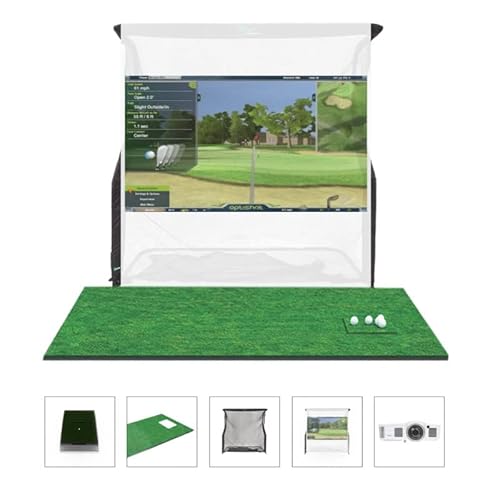
All-In-One Golf Simulator Studio: Comes complete with the SkyTrak ST MAX launch monitor, durable enclosure, impact screen, steel frame, premium 5×5 hitting mat, and ZW350ST short-throw projector — everything to build your indoor golf setup quickly.

Enhance Your Training with 3-Camera Precision: Equipped with a sophisticated 3-camera system, Premium Golf Launch Monitor and Simulator Approach R50 captures detailed ball and club metrics that reveal insights like ball speed, launch angle, and face-to-path alignment. This data allows golfers to finetune every aspect of their swing with precise feedback, making it an ideal tool for dedicated players looking to improve both indoors and outdoors with consistent accuracy.
Understanding Space and Placement Requirements

When setting up a home golf simulator, understanding the space and placement requirements is essential for ideal performance. Key considerations include:
Additionally, understanding launch monitor accuracy is vital, as it ensures that the feedback you receive during practice is both precise and beneficial for improving your game.
Proper planning in these areas enhances user experience, ensuring safety and performance in the simulator environment.
Installation Process for Your Launch Monitor
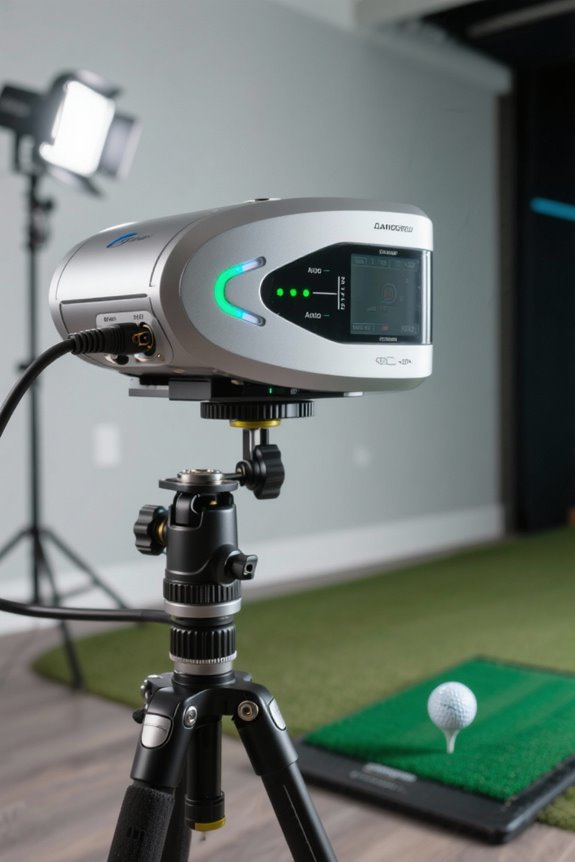
Installing a launch monitor correctly is essential for maximizing a home golf simulator‘s effectiveness. Following an installation checklist can streamline this process:
- Preparation and Planning
- Assess equipment compatibility and confirm necessary electrical outlets.
- Identify ideal mounting locations for unobstructed sensor views.
- Gather basic tools, such as screwdrivers and cable management accessories.
- Position the monitor on a stable surface, ensuring minimal vibrations.
- Adjust height and angle for proper sensor alignment with flight paths.
- Perform initial calibration by hitting practice shots.
- Fine-tune sensor angles for accuracy and update firmware as needed. Proper installation promotes a seamless golfing experience, enriching the connection within the golfing community, especially when utilizing advanced radar systems for improved accuracy.
- Popular Software Choices: Options like GSPro, E6 Connect, and Awesome Golf connect seamlessly—no extra fees required. The Square Golf’s pay-as-you-go model further reduces costs, promoting accessibility.
- Connectivity Methods: Most systems utilize Bluetooth and WiFi for effortless data transmission, allowing remote control from various devices. Some launch monitors also offer USB or Ethernet for more stable connections, ensuring optimal performance and reducing signal loss, especially with longer distances.
- Guidance and Support: Software platforms generally provide configuration tutorials, helping users troubleshoot and optimize their setup efficiently. This attentive support fosters a sense of community among golfers, enhancing shared experiences.
- Ball Speed: Indicates distance potential, typically ranging from 140 to 170+ mph using a driver.
- Carry Distance: Measures how far the ball travels before touching down, vital for shot evaluation.
- Launch Angle: Affects shot height and distance optimization.
- Spin Rate: Influences lift and distance, impacting shot accuracy.
- Swing Speed: Dictates power and distance, fundamental in swing analysis.
- Clean hitting mats, screens, and sensors weekly using microfiber cloths.
- Use non-abrasive, gentle cleaning solutions to avoid damage.
- Inspect cable connections for dust or debris regularly.
- Follow manufacturer-recommended calibration schedules for accuracy.
- Update simulator software and firmware monthly to maintain performance.
- Backup settings to cloud storage to prevent data loss.
- Check hardware, especially moving parts, for wear or damage.
- Verify proper lighting and stable environmental conditions.
- Understanding accuracy of data is essential for effective usage and performance improvement.
- Alignment Adjustments: Confirm the launch monitor is level and properly aligned to the target line. Misalignment can lead to inaccurate data.
- Lighting Considerations: Avoid bright lights or direct sunlight, which can interfere with sensor accuracy. A uniform environment is essential.
- Sensor Cleaning: Regularly clean sensors and camera lenses to remove dust that may obstruct tracking.
- Firmware Updates: Keep software updated to optimize performance and fix bugs.
- Equipment Inspections: Regularly check cables and other accessories for wear to confirm smooth operation.
- Environmental Setups: Maintain stable temperature and humidity to protect electronic components.
- Space Optimization: A minimum ceiling height of 9 to 10 feet is ideal, with depth of at least 15 feet for safety and comfort.
- Hitting Mats and Screens: Choose high-quality hitting mats that simulate real turf feel and durable impact screens for accurate ball trajectory visualization.
- Lighting Conditions: Incorporate adjustable LED lighting to minimize shadows and glare, enhancing clarity during play. Additionally, ensuring optimal performance can be achieved by utilizing a well-lit environment, which is crucial for accurate readings from the launch monitor.
Recommended Products
All-In-One Golf Simulator Studio: Comes complete with the SkyTrak ST MAX launch monitor, durable enclosure, impact screen, steel frame, premium 5×5 hitting mat, and ZW350ST short-throw projector — everything to build your indoor golf setup quickly.

BUNDLE INCLUDES: Full Swing KIT Golf Launch Monitor, and Signature Series Power Bundle

GOLFTEC Speed Training Exclusive to ST MAX - The only launch monitor with built-in GOLFTEC Speed Training — giving you guided drills, personalized swing insights, and a proven path to more distance. Used by over 10 million lessons worldwide, GOLFTEC's methodology is now built directly into your practice.
Software Integration and Connectivity Options

Proper software integration and connectivity options are essential components of a successful home golf simulator setup. Users should confirm software compatibility with their launch monitor to maximize performance. Here are key aspects to reflect on:
Recommended Products
What's Included: Enjoy indoor golf simulation with the included OptiShot2, software, USB cable, adjustable rubber tees, two foam practice golf balls, golf mat, net return, net return simulator screen, short throw HD projector.
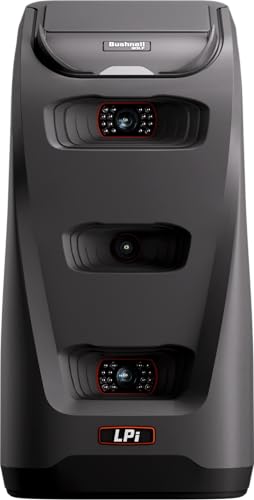
Camera-Based Measurement: The Launch Pro i features a proprietary three-camera imaging system with infrared that measures performance at impact for Tour-level accuracy—eliminating the guesswork common with radar-based launch monitors that rely on algorithms.

COMMERCIAL GRADE HEAVY DUTY IMPACT SCREEN: Built to withstand high speed golf ball impacts for lasting durability; Multi layer design reduces rebound and provides a smooth projection surface for all major launch monitors
Key Data Metrics Offered by Launch Monitors

Launch monitors play a pivotal role in the home golf simulator experience by providing essential data metrics that enhance player understanding and performance. Key metrics include:
These metrics provide clear insights into ball flight and contact quality, aiding players in refining their techniques for consistent performance. Additionally, the ability to track comprehensive metrics can significantly enhance the learning experience for golfers of all skill levels. Adopting this data can foster a sense of progress in the golf community.
Practical Tips for Maintenance and Optimal Use
Maintaining a home golf simulator requires attention to several key areas to guarantee peak performance and longevity. Regular upkeep makes certain your equipment operates smoothly and delivers superior results.
Cleaning Methods
Calibration Tips
Preventive Maintenance
With consistent attention and care, users can enjoy enhanced performance and longevity from their home golf simulators.
Troubleshooting Common Setup Issues
Setting up a home golf simulator can present various challenges, but identifying and resolving common issues can enhance the overall experience. Here are key troubleshooting steps:
These adjustments promote reliable data accuracy and enhance the simulation experience.
Recommended Products

Fine-tune your form with this premium launch monitor and simulator that utilizes a 3-camera system for precision metrics

[Real-Time Tracking with Dimple & Club Optix] High-speed cameras and infrared sensors provide near-zero latency. Dimple Optix reads any dimple pattern. Club Optix delivers real-time visuals of your club at impact.

Everything You Need in One Golf Simulator Kit: Enjoy a complete, professional setup right out of the box! The SIG12 Golf Simulator Enclosure includes a durable frame, precision fittings, and our SIGPRO Premium Impact Screen, all engineered for stability, longevity, and a true fairway feel. It can also be integrated seamlessly into optional add-ons like the SIG12 Simulator Flooring and other golf simulator accessories, letting you expand your setup for a clean, studio-quality finish.
Enhancing Your Home Golf Simulator Experience
To enhance the home golf simulator experience, several key factors should be considered for optimal performance and enjoyment.
Recommended Products

High Brightness FHD Laser Projector: Full HD (1920x1080p) resolution with a 1.1-1.5 throw ratio and 5,500 ANSI lumens for clear, detailed images in any space

SETUP INSTRUCTIONS: Refer to the user manual for setup, app download, and Bluetooth pairing, and watch the video below for assistance. For troubleshooting, check the tutorials in our Phigolf app.

SOLAR STREET LIGHTS: The 9500W solar security light has built-in 56 5054 super bright LED lamp beads and 40000mAh battery (lifespan up to 95,000 hours). Solar powered, no electricity bills, automatically turns on at dusk, charges during the day, and continuously illuminates for more than 28 hours (when fully charged). Best for commercial and garden lighting(There is only one solar panel available)
Frequently Asked Questions
What Are the Benefits of Using a Launch Monitor at Home?
Using a launch monitor at home provides improved accuracy and enhanced feedback, allowing golfers to refine their skills through detailed data analysis. This fosters a sense of community, encouraging shared learning and collective improvement among enthusiasts.
Can I Use My Launch Monitor Outdoors?
Yes, launch monitors can be used outdoors, but accuracy concerns arise with certain models. Choosing appropriate technology enhances outdoor usability, ensuring players benefit from reliable performance while enjoying a shared passion for golfing in open spaces.
How Often Should I Calibrate My Launch Monitor?
How often should one calibrate a launch monitor for ideal performance? Calibration frequency should align with usage intensity; regular calibration guarantees accuracy maintenance, particularly after equipment changes or environmental shifts, enhancing the overall golfing experience for all users.
What Are the Power Requirements for Launch Monitors?
Launch monitors typically demand modest power consumption of 10 to 50 watts, operating on standard 120V outlets. Higher-end models may require additional voltage for ideal performance, ensuring a seamless experience in home golf simulations.
Can Multiple Users Access the Same Launch Monitor Setup?
In a bustling cafe, patrons share tables yet seek individuality. Likewise, multiple users can access a launch monitor setup through shared access, utilizing distinct user profiles to guarantee personalized tracking and performance comparisons while fostering a sense of community.


